Showing posts with label vegetarian. Show all posts

Paleo Vegan Chili

Ok. When I first mentioned this to someone, they said "so it's tomato soup?"  But the true key to making a Paleo friendly chili that is also vegetarian/vegan is in the textures and spices.  In place of beans, I caramelize small bites of cauliflower until slightly chard but still crunchy. And the correct use of fresh spices makes the flavor divine (that's a shout-out to #Mark Divine of SEALFit).

Ingredient list:

*Olive oil
*Salt, black pepper and red pepper flakes
*1/2 head cauliflower cut into 1/2 inch pieces (the size of your favorite bean)
*1 onion, diced
*1 large red pepper, diced
*1 leek, cut in half and sliced in 1/2 inch moons (optional)
*3 garlic cloves, minced
*3 tbs tomato paste
*3 tbs cumin
*3 tbs chili powder
*1 tsp garlic powder (optional)
*1 25oz can tomatoes (San Marzano preferably)
*1 medium butternut squash, peeled and cut into 1/2 inch dice

Instructions:

In a Dutch oven, cook cauliflower over high heat in olive oil until starting to char and blacken just a bit.  Remove to a bowl and season with red pepper flakes and salt.  

Add additional olive oil to the Dutch oven and add onion, red pepper, leek and season with salt and black pepper and cook over medium high heat for about 7 minutes. Add the garlic, cumin, chili powder and tomato paste. Cook for an additional 3 or 4 minutes.  

Add the tomatoes. Rinse out tomato can with 1/2 can water and add to the Dutch oven.  Raise heat to high and bring to a boil and let cook at a slow boil for 5 minutes.  Taste and adjust seasoning as needed (this includes all spices because if your spices are older, they'll loose some of their flavor and you'll need to add more...or if you just like it spicier).

Add butternut squash and just enough water (if needed) to cover the squash. Bring back to a boil and reduce to medium low. Cook, stirring occasionally, for 30 minutes with the lid off to let the chili reduce and thicken. After 30 minutes, adjust seasoning again until it tastes great!  Add the cauliflower, stir and serve.

You can break with hardcore Paleo and Veganism by sprinkling a little shredded cheddar on top...if you dare!

Thanks to my buddy Andy Kort for making this last night and taking the photo for me.

Vegan Corn and Sweet Potato Chowder

My friend, Katie Case, visited us last week and said that she had gone vegan.  I find the concept of a true vegan diet very difficult for me to follow, as I am a dairy lover.  But there is inspiration in everything.

So last night, when trying to decide what to have for dinner, corn chowder came to the top of the list.  While I am trying to limit my white potato intake, I decided to make the chowder with sweet potatoes instead of the standard white potato that is the mainstay in chowder recipes.  And while configuring this dinner into my pseudo-Paleo diet, I thought I'd make it more interesting by making the chowder vegan.  Why not.

After some thought, I decided to try making the chowder with a broth base (I usually make my chowders with more milk and less broth) and stir in dairy free Tofutti sour cream.  And it worked perfectly!  So Katie, here's a recipe that that will give you creamy flavor in a vegan platform.  Enjoy.

Vegan Corn and Sweet Potato Chowder

Cook time: 1 hour  Serves 6


  • 1/4 cup olive oil
  • 1 large onion, diced
  • 2 large carrots, peeled and diced
  • 3 celery stalks, diced
  • 1 red bell pepper, seeded and diced
  • 1 yellow bell pepper, seeded and diced
  • 2 sweet potatoes, peeled and cut into 3/4 dice
  • 2 tsp salt
  • 1 tsp pepper
  • 5 sprigs of fresh thyme
  • 2 bay leaves
  • 5 cups vegetable stock
  • 12 oz package of frozen corn
  • 12 oz container of Tofutti non-dairy sour cream
  • Chopped parsley as a garnish (optional)


Start by heating a dutch oven or large soup pot over medium heat. Add the olive oil and then the onions.  Cook for a couple of minutes and add the carrots.  Cook for a couple of minutes and add the red and yellow peppers and the salt and pepper.

Cook the vegetables for a total of 15 minutes from the time you added the onions or until softened. Then add the thyme and bay leaves. I like to tie them together into a bouquet garni using kitchen twine as it is easier to fish them out at the end, but feel free to just toss them into the pot.


Now add the sweet potatoes and the broth. The broth should just cover the vegetables, so use less or more depending on your pot dimensions.  Stir to combine everything.  Now bring to a boil, then cover and reduce the heat to medium low.  Cook for 20 minutes.

Next add the corn and return to a boil over medium high heat and cook for 5 minutes. Turn off the heat (very important) and stir in the non-dairy sour cream and whisk it into the soup.  It will turn into a gorgeous creamy color in a minute. Check for final seasoning of salt and pepper as all vegetable stocks vary in this regard.

Ladle into bowls and garish with chopped fresh parsley and serve.


Maple Roasted Butternut Squash and Apple Risotto with Sage Butter

     Two things that are prevalent at the farmer's market right now are butternut squash and apples.  Last evening, one of the first cooler nights here in Bloomington, I was in real need of some hearty comfort food.  Looking at my produce bowl in my kitchen, I knew exactly what I wanted to make.

     The idea of roasting the squash with maple syrup comes right from my mother who used maple syrup in everything from baked beans to salad dressing to roasting any assortment of root vegetables and squash.

    This is the perfect meal to make for a casual dinner party where everyone is lingering in the kitchen. Risotto is so easy to make (despite what so many people say), the only trick is to attend to it every two or three minutes.  Plenty of time for a sip of wine and to join in on the conversation.

Maple Roasted Butternut Squash and Apple Risotto with Sage Butter
serves: 4  total time: 40 minutes

  • 1 1lb. butternut squash, peeled, seeded and cubed
  • 2 apples, cored and cubed
  • Olive oil
  • 2 tbs. maple syrup (even though I live in Indiana now, I'm still a huge fan of Vermont maple syrup)
  • salt and pepper
  • 3 garlic cloves, peeled and smashed but still intact
  • 1 medium onion, diced
  • 2 hot red chili pepper (or to taste), finely diced
  • 2 cups arborio rice
  • 2 quarts vegetable stock 
  • 1 cup dry white wine (whatever you are serving your guests or yourself)
  • 5 sage leaves
  • 2 tbs. butter
  • 1/2 cup parmigiano reggiano cheese, grated
Preheat the oven to 425

Place the butternut squash and apples on a rimmed baking sheet. Drizzle with olive oil and maple syrup.  Sprinkle with salt and pepper. Toss well to coat all evenly.  Roast in the oven for 20 minutes or until a fork can easily pierce through the squash.  Remove from oven and set aside.

Meanwhile, heat 2 quarts (8 cups) vegetable stock in a pot until just simmering. Cover and continue to let it simmer.

Heat a dutch oven or large pot over medium high heat. Add enough olive oil to fully coat the bottom of the pan. Add the garlic and let it cook for two or three minutes until the garlic is turning brown.  Now remove the garlic and discard. This will give you lovely garlic infused olive oil for cooking the risotto.

Add the onions and peppers to the dutch oven and reduce the heat to medium.  Season with salt and pepper and saute until the vegetables are translucent and softened.  Now add the rice and continue to cook for three or four minutes until the rice is fully coated with the oil and has just started to brown ever so slightly.

Now pour in the white wine and stir constantly for a minute or two, until the wine is almost fully evaporated.  Now is when the real cooking begins!

Pour a ladle of the stock over the rice.  Stir well to make sure that all the rice has lifted off the bottom of the pan.  Now sip a little wine for minute or two. Once the liquid has almost fully evaporated in pan, add another ladle full and repeat. Continue this process (the sipping of wine is fully optional but highly recommended) until you have incorporated all the stock into the risotto.

Taste a bit of the risotto and be sure that the rice is tender but still a little firm in the middle. Turn off the heat and stir in the cheese.  Now check for seasoning, adding salt and pepper to taste. At this point, put the lid on your dutch oven and let the risotto rest for a few minutes for up to 15 minutes  (it will absorb some of the liquid in the pot and firm up just slightly).

Now heat up the butter in a saute pan over medium heat.Chop the sage leaves and add to the butter.  Let this cook for a minute or two but don't let the butter brown too much.

Call the guests to the table.  Ladle out risotto into 4 bowls. Drizzle a teaspoon of the sage butter over the top of each bowl and sprinkle with additional cheese if you like. I also like to drizzle just bit of olive oil over the top to create a truly luscious texture. Serve immediately.

You can serve this with a fresh green salad, but the risotto is a wonderful meal all by itself.

French Style Onion and Oven Roasted Tomato Soup

It is amazing that the farmer's market still has such gorgeous tomatoes.  All of the organic tomatoes today were small and beautiful in color.

With my goal of trying to make food using only produce from the farmer's market, I decided that today's bounty would make a wonderfully sweet and luscious soup.

Roasting the tomatoes and caramelizing the onions brings out the most intense flavors.  Adding some herbs and garlic just enhances the natural flavors of the produce.

Because it takes a little time to make, it is the perfect soup to make on a day where you are at home with a list of chores as it takes very little man power, just random checking in.

French Style Onion and Roasted Tomato Soup
serves 4

  • 3 lbs tomatoes
  • 3 medium onions (or 6 small onions as that's what was available at the farmer's market)
  • 3 cloves of garlic, sliced
  • Thyme sprigs
  • Salt, black pepper and red pepper flakes
  • Olive oil
  •  4 c. vegetable broth (I prefer 2 tsp. of Better Than Bouillon and 4 cups water)
  • 1 tbs. dry basil
  • 1 tbs. balsamic vinegar 
  • 12 slices mozzarella cheese
  • 4 tbs parmigiano reggiano cheese, grated
Preheat the oven to 325 degrees
(cook time is 2 1/2 hours, but active time is only about 30 minutes)

Cover the bottom of a large baking sheet with olive oil.  Cut the larger tomatoes in half and core. Place all tomatoes on the baking sheet in a single layer.  Peel and slice the garlic and scatter over the tomatoes (note: don't crush the garlic here like everyone does on TV to peel it, simply roll the clove around on your cutting board a few times and the skin will come right off.  This allows you to slice the garlic cloves more easily).  Then lay a few branches of thyme over the tomatoes. Drizzle with more olive oil and season liberally with salt and black pepper. Place in the oven to roast for 2 hours.

Meanwhile, peel and slice the onions. Heat a large skillet over medium high heat. Add olive oil to the pan and add the onions. Season with salt and red pepper flakes to taste. The red pepper flakes infuse into the sweetness of the onions and it is wonderful.  Saute for a minute or two until the onions are coated in oil and the pan is sizzling. Then reduce the heat to low and cook for 1 hour and 45 minutes, until the tomatoes are done. Cooking on such a low temperature takes much longer, but it also takes much less maintenance.  Stir the onions every 15 minutes or so.

Put the tomatoes and all their lovely juices into a soup pot along with the garlic, removing the thyme stems. Add 4 cups of stock.  Puree the soup with an immersion blender, blender or food processor. Be sure to keep the tomato skins that will get stuck in the immersion blends as they will add great texture to the soup.

Now add the onions, basil and balsamic vinegar.  Bring to a simmer and cook on low heat to meld all the flavors. This soup can sit on the stove on low for quite a while.

Preheat the broiler in your oven.

When you are ready to serve, ladle soup into ramekins. Cover with the slices of mozzarella cheese and then sprinkle 1 tbs of Parmesan on top of the mozzarella. Put on a sheet pan and place in the oven until the cheese is browned.  Serve with a green salad and/or bread.


Scrambled Eggs with Apples, Onions and Oregano

Fall is the time when you start looking for dishes that are a little heartier. And to live deeper into the local food movement, every ingredient in this super flavorful dish is at the farmers market right now!

I had this dish for the first time years ago when I lived in Charlottesville Virginia.  The combination seemed so odd but tasted so wonderful. I've since bumped up the heat and made the cheese optional.

This is very high in protein for vegetarians and so full flavored that everyone will enjoy this for brunch, lunch or a light supper with a green salad.  The combination of apples, onions and oregano is fabulous.  If you want, add a small handful of cheddar cheese to add to the richness of the dish.

SCRAMBLES EGGS WITH APPLES, ONIONS AND OREGANO (plus cheddar cheese if you like)

serves one and super easy to double or quadruple

  •   3 eggs beaten
  • 1 small apple, cored and cubes
  • 1/2 medium onion, diced
  • 1/2 tsp dry or fresh oregano or to taste
  • olive oil
  • 1/4 tsp red pepper flakes or 1/4 hot pepper, seeded and minced
  • salt and pepper to taste
Start by heating up a non-stick skillet to medium to medium high.  Add a little olive oil to the pan and then add the onions, apples, oregano, red pepper and a sprinkle of salt.  Saute for about 5 minutes until the vegetables are just starting to soften.

Add the eggs and sprinkle with a bit of black pepper and cook for one minute.Turn off the heat and continue to cook, using the residual heat of the pan, until the eggs are done to your liking. This will take two to four minutes depending on how dry you like your eggs. (if adding cheddar cheese, do so as you turn the heat off so it has ample time to melt without cooking.)

This is excellent with a tossed salad and a glass of red wine!

Savory Chard Pie

This recipe is a standard go-to in our house. The flavors are beautiful and unique, the ingredients are healthy, and this dish is just as good when reheated later in the week.


You can almost always find chard year round. And this time of year your can find it at the Bloomington Winter Farmer's Market. It is grown all winter hydroponically by a local farmer and it is so amazing to cook with such wonderful and fresh local ingredients all year. The photo to the left is of the stems from rainbow chard which are incorporated into the pie. Nothing goes to waste here.

The original recipe for this dish was from Laura Calder. Her version uses bacon but it was quite easy to manipulate the recipe to make it vegetarian.

A couple of kitchen items will make this dish come together more easily: a 10 inch sping form pan, parchment paper, 1/2 lb. dry beans or pie weights.

Savory Chard Pie
  • 1 pie crust (I cheat and use Pillsbury premade pie crusts)
  • olive oil
  • 2 shallots, minced
  • 2 garlic cloves, minced
  • 1 1/2 lb swiss or rainbow chard
  • 3 eggs
  • 1 cup creme fraiche (easily found in the cheese section of Bloomingfoods east side)
  • 4 oz gruyere cheese, grated
  • a generous handfull of raisins
  • a small handfull of pine nuts
  • salt and black pepper
To start, blind bake the pie crust in a 10 inch spring form pan or deep pie plate (I prefer to use a spring form pan because it makes for a lovely presentation, but it will be delicious either way). HOW TO BLIND BAKE: Pre-heat the oven to 450.  Roll out the pie crust and place in the spring form pan, pressing the crust up the sides of the pan. Take a large piece of parchment paper and lay it over the pan. Then pour in pie weights or dry beans to cover the bottom of the pie.  This will keep the crust from rising up during baking. Then place in the heated oven for 10 minutes.  Remove the pan from the oven, lift out the parchement paper with the beans and then return the pan to the oven for three more minutes to allow the bottom of the crust to brown slightly. Remove from the oven and set aside until you are ready to bake the pie.

Reduce the oven temperature to 375.

Start by filling your sink with cold water. Add the chard, stems and all, and let them soak for a few minutes to loosen any dirt. Then pick up each leaf, grab the bottom of the stem in one hand, and use the other hand to pull the leaf from the stem. If the stem breaks off with the leaf, it's OK because it means that the stems are tender at that point.  Save the stems and put the  leaves back in the water to continue to soak.

In a saute pan, heat olive oil over medium heat. Add the shallots, season with salt and pepper, and cook for about 3 mintues. Then add the garlic and cook for two more minutes, stirring often to keep the vegetables from browning too much. Remove the shallots and garlic to a large bowl.

Put the pan back on the heat over medium.  Add olive oil to the pan. Chop the chard stems into small pieces and add to the pan with salt and pepper. Put a lid on the pan and cook for 4 minutes.  While the chard stems are cooking, remove the leaves from the water and wring dry.  Chop the leaves coursely.  Then add the leaves to the pan, season again with salt and pepper, and cook for five minutes uncovered. The leave should be well wilted.  Remove the chard and add to the bowl with the shallots and garlic. (If there is water in the bottom of the pan, use a slotted spoon to remove the chard leaving the water behind.)

In a dry saute pan, add the pine nuts and toast over medium high heat, stirring often, until they start to brown.  Add them to the bowl with the chard. 

Now add the large handfull of raisins to the bowl as well and stir to combine. Then add the grated cheese and stir to combine. Now check for seasoning. You want this mixture of chard, raisins, pine nuts, shallots, garlic and cheese to be very flavorful at this point.

In a seperate bowl, combine the eggs and creme fraiche and beat until well combined. Season with salt and pepper.

Place the vegetable mixture into the pie crust.  This should fill the crust almost to the top. Then pour the egg and creme fraiche mixture over the top as evenly as possible. It will look as if it is about to overflow, but it should not...

Now place the pie in the heated oven and bake for 35 minutes, until set in the center.  I find that a couple of extra minutes in the oven does not hurt this dish at all.

Let cool slightly or serve at room temperature. This pie will serve six as a main course when served with a salad.

If there are left overs, it can be eaten cold and it is delicious. Or reheat in the microwave for 45 seconds to warm through.

Four ingredients to the perfect comfort food: Cauliflower Gratin


Whenever we are looking for cozy and simple comfort food in our house, this is one of our go-to dinners.  With just four ingredients (often already in house), thirty minutes, plus a green salad, we are set!


Cauliflower Gratin
  • 1 head cauliflower, cut into large florets keeping much of the stem
  • 1 cup heavy cream (comfort food, not diet food)
  • 1 cup grated cheese such as cheddar and Parmesan
  • 2 tbs. Dijon mustard
  • salt and pepper to taste
Pre-heat oven to 425.

Drop the florets into boiling salted water and cook for 4 minutes. Drain and set on a kitchen towel to help them to dry.

In a mixing bowl, combine cream, mustard, 1/2 tsp or more of black pepper and 1 tsp. salt. 

Place the cauliflower into a baking dish and it should fit in one layer with only some overlapping of florets.  Stir in the grated cheese to mix well. Then pour over the cream mixture.

Bake in the middle of the oven for 30 minutes or until the edges are dark brown and the center is bubbling.

Vegetarian Pot Pie with a Chive Biscuit Top

Whenever I make a chowder, stew or hearty soup, I always make extra so we can have pot pies later in the week. The base for this soup is my Vegan Winter Vegetable Soup. Sometimes I use this biscuit topping, sometimes a store bought pie crust, and sometimes I go with a shepherds pie and use left over mashed potatoes. Anyway you go, this is a wonderful country style meal.

The biscuits in this recipe have butter. Using a pie crust or mashed potatoes that are vegan would make this dish vegan as well.

Vegetarian Pot Pies with a Chive Biscuit Top serves 4

  • 4 cups left over Vegan Winter Vegetable Soup (or any left over soup you have made this week)
  • 2 cups flour
  • 2 1/2 tsp. baking powder
  • 1 tsp. salt
  • 1/3 c. cold butter, cut into cubes
  • 2/3 cups cold milk (you may need more or less)
  • 1/2 cup chopped chives or fresh herb of your choice
Preheat the oven to 375 and butter 4 individual ramekins or one 8" x 10" x 2" baking dish.

To make the biscuit topping, put the flour, baking powder and salt into the bowl of a food processor. Pulse several times which will mix the ingredients and act as a sifter. Then, with the motor running, add the cubed butter a couple of pieces at a time until all has been used and the flour mixture has small pea sized pieces of butter throughout. This will only take a few seconds. Then add the herbs and pulse two or three times.

With the motor running, slowly add the cold milk a little at a time until the dough begins to form a ball around the blade. Stop the processor and turn the dough out onto a floured work surface.

Kneed the dough a few times, adding a little bit of extra flour if the dough is sticky. Then roll out into a square that is about 10" x 10". If making individual pot pies, cut
out the pie crust into circles that are just smaller than the tops of the ramekins. If are using a larger baking dish, cut the dough into 4" x 4" squares.

Ladle the soup into the ramekins or baking dish. Place the biscuit dough on top. You can brush egg wash over the top if you want an extra golden crust. Sprinkle the top of the dough with a little kosher salt. Place in the oven and bake for 25 to 30 minutes, until the pot pie is bubbling around the edges.

Serve once the pot pies have had a few minutes to cool.


Pasta with Roasted Squash, Kale and Brown Buttered Sage


This is a quick and simple pasta dish that is a complete meal in one bowl...my favorite kind of pasta dish.

Created to use up left over roasted squash from another meal, you could certainly use frozen butternut squash. Simple thaw and saute in a little olive olive oil and maple syrup. Then add to this recipe as directed below.

Pasta with Roasted Squash, Kale and Brown Buttered Sage Leaves serves 4
  • Olive oil
  • 1 red onion, thinly sliced
  • 1 tbs brown sugar
  • 6 anchovies (optional)
  • 2 cups roasted squash, cubed (or frozen and prepared as noted above)
  • 4 cups kale (or other dark greens) shredded or chopped
  • 1 lb. penne or your favorite pasta
  • 1 tbs. butter
  • 10 sage leaves
  • salt and pepper to taste
  • 1 cup grated parmesan cheese
Bring a large pot of salted water to a boil and add the greens. Cook for ten minutes if using a thick sturdy leaved green like kale, or 5 minutes if using chard or another softer leaved green.
While the greens are cooking, heat a large saute pan over medium heat. Add the oil, onions, brown sugar, anchovies, salt and black pepper. Once sizzling, reduce the heat to medium low to let the onions caramelize.
When the greens are cooked, scoop them out of the pot with a slotted spoon right into the saute pan with the onion mixture. Reduce heat to low and add the squash. Continue to cook.
Meanwhile, in the same pot that you cooked the greens, bring the water back to a boil (add more water if needed) and add the pasta. Cook for 8 minutes.
Add the pasta to the saute pan with the greens along with one or two ladles of pasta cooking water. Raise the heat to medium and cook to let the pasta water reduce and become a sauce.
Meanwhile, heat the butter in a small saute pan. Add the sage leaves and let the butter brown for two minutes or so. Turn off the heat and reserve this for plating.
When the pasta has cooked for 5 or so minutes, turn off the heat. Add 3/4 cups of the cheese, stir combine and cover the pan. Let stand for 5 minutes while you bring people to the table.
To plate, put pasta in 4 bowls, sprinkle the remaining cheese over the pasta and top with the brown butter and sage leaves.

Pasta de Provence


A dear friend just returned from NYC. While there, she visited her favorite herb shop and brought me a gift of a package of herbs de provence. The french blend of herbs traditionally contains savory, basil, thyme, lavender and fennel.

So with a cold wintry night at hand and a bag of herbs de provence in hand, I came up with this lovely french themed pasta dinner.

Pasta de Provence for 4
  • 1 1/2 lb. roma tomatoes (about 6 medium) quartered lengthwise and de-seeded
  • 2 tbs. herbs de provence
  • 4 shallots, thinly sliced
  • 1 garlic clove, minced
  • 5 oz. box of baby arugula
  • 1 lb. fettuccine
  • 8 oz. brie, cut into small cubes (this is much easier to do when very cold)
  • 1/2 c. white wine
  • 1/2 c. bread crumbs made from fresh bread, pulsed in a food processor
  • Olive oil
  • 1/4 c. chopped fresh parsley

Preheat the oven to 425. Place the quartered and seeded roma tomatoes on a baking sheet. Drizzle with olive oil, salt and 1 tsp. of herbs de provence. Roast for 20 minutes, then remove from the oven and let rest on the baking sheet until you are ready to incorporate them into the dish.
Boil the pasta in water with 1 tbs. salt until al dente, about 8 minutes.
Meanwhile, in a large sauce pan, heat olive oil over medium to medium low heat. Add the shallots, garlic, salt and pepper. Saute for 5 minutes, stirring often.
Add the roasted tomatoes, arugula and wine. Raise the heat to medium and cook until the greens are wilted and the wine has reduce, about 5 minutes.
Add the pasta to the pan with the greens, along with a half cup of the pasta cooking water. Stir to combine and let sit, covered, for 3 minutes.
While the pasta is resting, place the bread crumbs on the baking sheet that the tomatoes were roasted in. Drizzle a little olive oil over the bread crumbs with a little salt. Stir and put into the oven which is still at 425. Cook them for two or three minutes until golden brown. Remove the pan from the oven and, using a spatula, scrape up the bread crumbs and any brown bits left from roasting the tomatoes.
Transfer the hot pasta to a serving bowl. Add the brie cubes and stir to combine. The brie will melt within a minute or so. Sprinkle the bread crumbs over the top of the pasta along with 1 tbs. herbs de provence and the parsley. Then drizzle a little extra virgin olive oil over the pasta.
Serve immediately and enjoy the hardy flavors of France.

Marie Duane's Spinach Balls


We met Marie Duane while living in Woodstock and she and her husband Allan became great friends of ours. An evening at the Duane's was always a wonderful event. Marie was from New Zealand and she and Allan had lived all over Europe and they brought a very warm sense of entertaining with them to New York. I was taken by these spinach balls the first time I tried them.

Along with Ina Garten's Stilton and Walnut Crackers, this should be a mainstay in your freezer for last minute entertaining. Easy to make and they are best when cooked while frozen, this is a no brainer and full flavor appetizer.

Marie Duane's Spinach Balls
  • 2 packages of frozen spinach, thawed and squeezed dry
  • 2 cups stuffing mix (Pepperidge Farm works perfectly)
  • 6 eggs, beaten
  • 3/4 cup melted butter (1 1/2 sticks...not a diet food, but they are small bites)
  • 1 cup chopped onion (one small to medium onion)
  • 5 cloves garlic, minced
  • 1/2 grated parmesan cheese
  • 1 tbs. black pepper
  • 1 tbs. salt
Start by putting the spinach in boiling water to thaw. Then put in a colander and press dry with the back of a kitchen spoon. Let cool a few minutes. (The water that the spinach was cooked in can be the base for a healthy vegetable stock if saved.)
Mix all ingredients in a large bowl. You'll have to work to have the spinach evenly distributed. Then chill the mixture in the refrigerator for one hour.
Use a table spoon to scoop out a portion of the mixture and form into a ball. Put on a cooking sheet and continue. Then put the filled cookie sheet in the freezer for a couple of hours or over night. Then you can store them in an air tight container in the freezer.
When you are ready to bake them, preheat the oven to 425 degrees. Then put as many as you wish to serve on a cooking sheet, leaving a little room between each ball. Then back for 22 minutes.
Serve with dijon or spicy brown mustard.

Recipe: Brussels Sprouts and Pearl Onions in Horseradish Cream


The original recipe for this was clipped from Bon Appetit several years ago. And this dish is consistently a winner. The prep work can be done the day before and then it only takes a few minutes to put the dish together, so it's great for entertaining.

Brussels Sprouts and Pearl Onion is Horseradish Cream:
  • 1 10 oz. bag frozen pearl onions (easy to find at Marsh in the frozen veg section)
  • 1 1/2 lb. brussels sprouts, ends trimmed and blemished exterior leaves removed
  • 4 tbs. prepared horseradish
  • 2 tsp. flour
  • 1/4 tsp. allspice
  • 3/4 c. whipping or heavy cream (you can use milk, but the dish will not be as rich)
  • 3 tbs. butter
  • 1 tsp. chopped fresh thyme
  • Thyme sprigs for garish (optional)
Drop brussels spouts into salted boiling water and boil for 5 minutes. Add the bag of frozen pearl onions and continue to boil for two more minutes. Drain and set aside. This part can be done the day before.
In a bowl, combine the horseradish, flour, allspice and cream. Stir well. In a large sauce pan, melt the butter over medium heat. Add the fresh thyme and cook for 30 seconds. Add the brussels sprouts and onions and continue to cook for 3 for 4 minutes, until the vegetables are heated through. Add the cream mixture to the sauce pan and stir to coat all the vegetables. continue to cook, stirring often, for about 3 minutes. Taste for salt and pepper and season appropriately.
Serve garnished with a thyme sprig. Yum!

Bloomington Thanksgiving dinner 2011: Golden Lentil Roulade with Chestnut Stuffing


This is the premier vegetarian entree for Thanksgiving. The original recipe was clipped from a vintage Vegetarian Times, but it has been reworked because the first time I made it...let's just say it didn't work.

Don't be put off by all the different spices that are in this recipe. Using the bulk section of the east side location of Bloomingfoods, you can purchase just the right amount of each spice for just a few cents each.

This recipe calls for a total of 4 cups of fresh bread crumbs. One baguette will produce enough bread crumbs for the entire recipe (plus a little extra). Slice the bread and put it in a food processor until it the largest pieces of bread are the size of peas.


Golden Lentil Roulade with Chestnut Stuffing

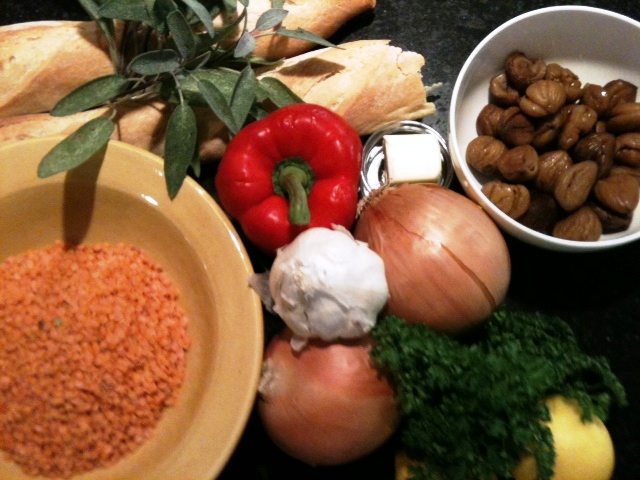
  • 1 1/2 cup split red lentils
  • 3 cloves garlic, chopped
  • 2 cups fresh bread crumbs
  • 1/2 tsp. salt
  • 1/4 tsp. black pepper
  • 2 tbs. butter, at room temperature
for the chestnut stuffing:
  • 2 tbs. olive oil
  • 1 large onion (or 1 cup) chopped
  • 1 large red bell pepper, chopped
  • 1 1/2 cups canned or jarred peeled chestnuts (found a Bloomingfoods on their discount rack)
  • 2 cups fresh bread crumbs
  • 1/4 cup fresh sage, chopped
  • 1/4 cup fresh parsley, chopped
  • fresh sage leaves for garnish
Preheat your oven to 350.
In a medium sauce pan, combine the lentils and 2 cups water. Bring to a boil, cover and reduce to simmer for 15 minutes or until the lentils have absorbed all the water.
Stuffing: In a large saute pan, heat the olive oil. Add the onions and the red pepper and season with a little salt and pepper. Cook, stirring often, for about 7 minutes or until the onions are translucent.
In a food processor, combine the chestnuts, bread crumbs, sage, parsley and cooked onions and peppers. Pulse on and off until well combined. Transfer to a large bowl and add salt and pepper to taste. Keep in mind that this is the big flavor in the dish so don't be afraid to season really well.
Now for the lentil dough (and dough is used loosely here). Put the cooked lentils in the food process along with the garlic, bread crumbs, salt and pepper. Process until smooth. This will become like thick peanut butter.
Place a large (2' long) sheet of wax or parchment paper on the counter near your sink. Empty to lentil dough onto the paper. Wet your hands and gently kneed the dough a few times to create a log shape. Then pat out the dough until it is an 11 x 14 inch rectangle. You will need to wet your hands a few times during the process to keep the dough from clinging to your hands.
Now the easy part. Once the dough is in an 11 x 14 rectangle, spread the chestnut stuffing evenly over the dough, making sure to go all the way to the ends of the dough. Then, starting with the short end of the dough, start to roll it up using the parchment paper to help lift and roll the dough into a jelly roll shape.
Once rolled, you can wet your hands again and reshape the log if needed, replacing any of the stuffing that fell out of the ends.
Transfer to a well greased sheet pan. Rub the room temperature butter all over the outside of the log. Bake in the oven until heated through and the outside is just beginning to brown, about 15 to 20 minutes.
Transfer to a serving platter and garnish with the reserved sage leaves.

And check out the sandwich made with left over roulade in the 'Leftover Recipes' section.

Bloomington Thanksgiving Dinner 2011: Brown Butter and Rum Pecan Pie with Rum Whipped Cream


The last time I made this pecan pie was when we were living in Woodstock, NY. We had ten friends over for dinner and during dinner the snow started coming down. Right before dessert the power went out...so no making the rum whipped cream in the mixer. Instead we did it the old fashion way by passing the bowl around the table, everyone taking a turn at whipping the rum and cream for desert topping. It was a lovely evening.

Brown butter and rum add a great depth of flavor to this classic southern pie.

Brown Butter and Rum Pecan Pie with Rum Whipped Cream
  • One store bought pie crust (I can't do any better than Pillsbury) or homemade pie crust
  • 6 oz unsalted butter
  • 1 cup Karo dark corn syrup
  • 1 cup sugar
  • 4 eggs
  • 4 tbs. rum (the original recipe called for dark rum, but light rum was what was in my pantry)
  • 2 tsp. vanilla extract
  • pinch of salt
  • 1 1/2 c whipping cream
  • 3 tbs. light or golden brown sugar
Preheat the oven to 350 and put the baking rack in the bottom third of the oven.

Roll out dough and put in a 9 inch diameter glass pie plate, crimping the edges.

Cook the butter in a sauce pan over medium high heat until brown, approximately 3 minutes. Add the corn syrup and stir. Then add the sugar and whisk until the sugar is dissolved. Remove from heat and pour the mixture into a heat proof bowl. Set the bowl in the fridge to cool to close to room temperature. This will take about 20 minutes or so.

In a mixing bowl, beat the eggs, rum, vanilla extract and salt to combine. Pour in the cooled syrup mixture and whisk vigorously to combine. Make sure the syrup mixture is cool enough to not scramble the eggs. Then stir in the pecans and mix well. Pour this mixture into the pie crust and bake for approximately 45 minutes. The top of the pie filling will have risen almost and inch and set and the crust will be gorgeous golden brown. In my oven this took closer to 50 minutes for the center to set.

This can be made the day before. Keep at room temperature covered loosely with foil once it has completely cooled.

For the whipped cream, combine cream, 2 tbs rum and the light brown sugar and beat until peaks form. Feel free to pass the bowl around the table and have your guest help whip the cream into shape. It can burn calories and create memories.

Starting to cook...Stilton and Walnut Crakers for Thanksgiving dinner cocktail hour


This recipe is so simple and so delicious. Martha says that she doesn't serve any appetizers because she wants everyone to be really hungry when they come to the table. Ina loves to have appetizers to encourage guests to start enjoying her food when they arrive. I am in the middle...a light appetizer that encourages guests to enjoy another cocktail before dinner, but it has to be small enough to keep them hungry for dinner. And this is the perfect recipe.

You can find this recipe online here. It is in Ina's cookbook 'barefoot contessa how easy is that?' And one of the best things is that it can be made months in advance and frozen. They you can cut the log into crackers while frozen and bake to perfection in only 22 +/- minutes.

I try to make a couple of logs of this while working with the recipe and then I always have the perfect nibble when guest come over during the cold winter months.

Appetizer for Thanksgiving dinner...done.

Thanksgiving Leftover Deliciousness


The day after Thanksgiving, when the refrigerator is full of leftovers and I'm still in the mood to use them, I try to be creative. So late this morning I made a batch of pie crust:

  • 2 c all purpose flour
  • 1 tsp salt
  • 2/3 c chilled butter
  • 1/3 c +/- ice water
I put the flour in a food processor with the salt. I cut the butter into small cubes and added them to the food processor a few at a time, running the processor for a few seconds with each addition until all the butter was incorporated and the flour looked like course meal. Then I slowly added the ice water a little at a time while the food processor was running. I did this until it just started to pull away from the sides of the bowl and form a ball.
Then I put the dough onto a board with some flour and needed it just a few times, adding enough flour to make it not sticky. I formed it into a ball and placed it in plastic wrap and put it in the fridge for 20 minutes to chill again (the dough will be more flaky if the dough is super chilled).
For the homemade 'hot pockets' I used half my dough. I rolled it out to pie crust thickness and cut it into rounds (I used a cereal bowl that was about 4 1/2 inches in diameter). In each round I put a small amount of my stash of leftovers:
  • Turkey
  • Stuffing
  • Roasted Maple Butternut Squash
Then I sprinkled a little cheddar cheese over the filling. I used my finger to put just a bit of water around the edge of the dough circle. Then slowly I folded each round in half, stretching the dough just a little to make a perfect half moon. I crimped the edges of the pies (like my mother used to do around the edge of an apple pie). I brushed a little egg wash (one egg and a few drops of water and well beaten) over the top and sprinkled each with a little kosher salt and a little pepper. I put a vertical slit in the top of the ones with turkey and a horizontal slit in the ones for me without turkey. Then I put them in a 400 degree oven for 30 minutes. YUM!!! YUM!!
The cranberry tartlettes are right out of Martha Stewart Living's Nov. 2010 issue on page 58. Basically I put a 2 1/-4" square of pie crust from the other half of my batch that i make into the cups of a mini muffin tin. Then I put 1/2 tsp of cranberry relish into each cup. I folded the dough over and put them in the freezer for 30 minutes. Then I brushed each with the egg wash and sprinkled sugar over the top. They cooked along with the recipe above for the 30 minutes. Super easy.

Thanksgiving Leftovers: Lentil Roulade Sandwich with Cranberry Relish...think meatloaf for the vegetarian


The Golden Lentil Roulade with Chestnut Stuffing, posted on Thanksgiving day 2011, makes the best sandwiches the next day or days after.
The roulade slices perfectly and, when paired with mayo and cranberry relish on whole wheat toast, it is like the best Thanksgiving leftover sandwich for the vegetarian or carnivore. The herbal flavor of the stuffing and the sweetness of the chestnuts goes perfectly with the tart and fresh flavor of the cranberry relish.