Paleo Vegan Chili

Ok. When I first mentioned this to someone, they said "so it's tomato soup?"  But the true key to making a Paleo friendly chili that is also vegetarian/vegan is in the textures and spices.  In place of beans, I caramelize small bites of cauliflower until slightly chard but still crunchy. And the correct use of fresh spices makes the flavor divine (that's a shout-out to #Mark Divine of SEALFit).

Ingredient list:

*Olive oil
*Salt, black pepper and red pepper flakes
*1/2 head cauliflower cut into 1/2 inch pieces (the size of your favorite bean)
*1 onion, diced
*1 large red pepper, diced
*1 leek, cut in half and sliced in 1/2 inch moons (optional)
*3 garlic cloves, minced
*3 tbs tomato paste
*3 tbs cumin
*3 tbs chili powder
*1 tsp garlic powder (optional)
*1 25oz can tomatoes (San Marzano preferably)
*1 medium butternut squash, peeled and cut into 1/2 inch dice

Instructions:

In a Dutch oven, cook cauliflower over high heat in olive oil until starting to char and blacken just a bit.  Remove to a bowl and season with red pepper flakes and salt.  

Add additional olive oil to the Dutch oven and add onion, red pepper, leek and season with salt and black pepper and cook over medium high heat for about 7 minutes. Add the garlic, cumin, chili powder and tomato paste. Cook for an additional 3 or 4 minutes.  

Add the tomatoes. Rinse out tomato can with 1/2 can water and add to the Dutch oven.  Raise heat to high and bring to a boil and let cook at a slow boil for 5 minutes.  Taste and adjust seasoning as needed (this includes all spices because if your spices are older, they'll loose some of their flavor and you'll need to add more...or if you just like it spicier).

Add butternut squash and just enough water (if needed) to cover the squash. Bring back to a boil and reduce to medium low. Cook, stirring occasionally, for 30 minutes with the lid off to let the chili reduce and thicken. After 30 minutes, adjust seasoning again until it tastes great!  Add the cauliflower, stir and serve.

You can break with hardcore Paleo and Veganism by sprinkling a little shredded cheddar on top...if you dare!

Thanks to my buddy Andy Kort for making this last night and taking the photo for me.

Honey Citrus 'Semi-Guilt-Free' Cake

I am not a baker.  I don't like to measure and I cook by taste and sight much more than I do by measurements and timing.  BUT, you have to have a cake in your arsenal.  I saw an easy cake recipe from Melissa d'Arabian and had to try it.  It was fine, but not geared to the palate of our household. So after a couple of tries, I turned her spice cake into this citric cake.

And it only takes ten minutes to mix together, twenty-five minutes to bake and ten minutes to cool. So you can easily make this any weeknight.  Or you can make it a day ahead, it keeps perfectly. I am catering an event for about 20 people tonight, so I baked two of these cakes last night and they are ready to go!


Cake ingredient list:
1 cup unbleached all-purpose flour
1 tsp. baking powder
1/4 tsp. baking soda (the box in the back of your fridge)
1 tsp. kosher salt
1 egg
1/2 cup unsweetened applesauce (organic if possible, Kroger sells a great organic house brand)
1/2 cup honey
2 tbs. canola oil (any vegetable oil will do)
1 tsp. vanilla
the zest of one orange
the zest of one lemon
1 tbs. orange juice

Glaze ingredient list:
1/2 cup powdered sugar
2 tbs. orange juice
(glaze is totally optional, depending on how healthy you want this cake to be)

Preheat oven to 350 degrees.

Spray a nine inch cake pan with  non-stick spray.

In a large bowl, whisk together the first 4 ingredients. In a separate bowl, whisk together the rest of the ingredients (minus the glaze ingredients). Add the wet ingredients to the dry ingredients and gently whisk in a folding motion everything is well incorporated.

Pour cake batter into the cake pan and put in the oven. Bake for 25 minutes, until the top of the cake gently springs back when touched.

Remove the cake from the oven and put cake pan on a wire rack to cool for ten minutes. Then invert the cake onto a plate, removing the cake pan. Then invert back onto the wire rack. This allows the cake to cool completely.

When the cake is cooled completely, mix together the glaze ingredients, whisking until there are no lumps. Then pour evenly over the cake.  I use a pastry brush to smooth our the glaze, as it tends to puddle in the middle of the cake.

Now your are ready to serve it up!


Vegan Corn and Sweet Potato Chowder

My friend, Katie Case, visited us last week and said that she had gone vegan.  I find the concept of a true vegan diet very difficult for me to follow, as I am a dairy lover.  But there is inspiration in everything.

So last night, when trying to decide what to have for dinner, corn chowder came to the top of the list.  While I am trying to limit my white potato intake, I decided to make the chowder with sweet potatoes instead of the standard white potato that is the mainstay in chowder recipes.  And while configuring this dinner into my pseudo-Paleo diet, I thought I'd make it more interesting by making the chowder vegan.  Why not.

After some thought, I decided to try making the chowder with a broth base (I usually make my chowders with more milk and less broth) and stir in dairy free Tofutti sour cream.  And it worked perfectly!  So Katie, here's a recipe that that will give you creamy flavor in a vegan platform.  Enjoy.

Vegan Corn and Sweet Potato Chowder

Cook time: 1 hour  Serves 6


  • 1/4 cup olive oil
  • 1 large onion, diced
  • 2 large carrots, peeled and diced
  • 3 celery stalks, diced
  • 1 red bell pepper, seeded and diced
  • 1 yellow bell pepper, seeded and diced
  • 2 sweet potatoes, peeled and cut into 3/4 dice
  • 2 tsp salt
  • 1 tsp pepper
  • 5 sprigs of fresh thyme
  • 2 bay leaves
  • 5 cups vegetable stock
  • 12 oz package of frozen corn
  • 12 oz container of Tofutti non-dairy sour cream
  • Chopped parsley as a garnish (optional)


Start by heating a dutch oven or large soup pot over medium heat. Add the olive oil and then the onions.  Cook for a couple of minutes and add the carrots.  Cook for a couple of minutes and add the red and yellow peppers and the salt and pepper.

Cook the vegetables for a total of 15 minutes from the time you added the onions or until softened. Then add the thyme and bay leaves. I like to tie them together into a bouquet garni using kitchen twine as it is easier to fish them out at the end, but feel free to just toss them into the pot.


Now add the sweet potatoes and the broth. The broth should just cover the vegetables, so use less or more depending on your pot dimensions.  Stir to combine everything.  Now bring to a boil, then cover and reduce the heat to medium low.  Cook for 20 minutes.

Next add the corn and return to a boil over medium high heat and cook for 5 minutes. Turn off the heat (very important) and stir in the non-dairy sour cream and whisk it into the soup.  It will turn into a gorgeous creamy color in a minute. Check for final seasoning of salt and pepper as all vegetable stocks vary in this regard.

Ladle into bowls and garish with chopped fresh parsley and serve.


Maple Roasted Butternut Squash and Apple Risotto with Sage Butter

     Two things that are prevalent at the farmer's market right now are butternut squash and apples.  Last evening, one of the first cooler nights here in Bloomington, I was in real need of some hearty comfort food.  Looking at my produce bowl in my kitchen, I knew exactly what I wanted to make.

     The idea of roasting the squash with maple syrup comes right from my mother who used maple syrup in everything from baked beans to salad dressing to roasting any assortment of root vegetables and squash.

    This is the perfect meal to make for a casual dinner party where everyone is lingering in the kitchen. Risotto is so easy to make (despite what so many people say), the only trick is to attend to it every two or three minutes.  Plenty of time for a sip of wine and to join in on the conversation.

Maple Roasted Butternut Squash and Apple Risotto with Sage Butter
serves: 4  total time: 40 minutes

  • 1 1lb. butternut squash, peeled, seeded and cubed
  • 2 apples, cored and cubed
  • Olive oil
  • 2 tbs. maple syrup (even though I live in Indiana now, I'm still a huge fan of Vermont maple syrup)
  • salt and pepper
  • 3 garlic cloves, peeled and smashed but still intact
  • 1 medium onion, diced
  • 2 hot red chili pepper (or to taste), finely diced
  • 2 cups arborio rice
  • 2 quarts vegetable stock 
  • 1 cup dry white wine (whatever you are serving your guests or yourself)
  • 5 sage leaves
  • 2 tbs. butter
  • 1/2 cup parmigiano reggiano cheese, grated
Preheat the oven to 425

Place the butternut squash and apples on a rimmed baking sheet. Drizzle with olive oil and maple syrup.  Sprinkle with salt and pepper. Toss well to coat all evenly.  Roast in the oven for 20 minutes or until a fork can easily pierce through the squash.  Remove from oven and set aside.

Meanwhile, heat 2 quarts (8 cups) vegetable stock in a pot until just simmering. Cover and continue to let it simmer.

Heat a dutch oven or large pot over medium high heat. Add enough olive oil to fully coat the bottom of the pan. Add the garlic and let it cook for two or three minutes until the garlic is turning brown.  Now remove the garlic and discard. This will give you lovely garlic infused olive oil for cooking the risotto.

Add the onions and peppers to the dutch oven and reduce the heat to medium.  Season with salt and pepper and saute until the vegetables are translucent and softened.  Now add the rice and continue to cook for three or four minutes until the rice is fully coated with the oil and has just started to brown ever so slightly.

Now pour in the white wine and stir constantly for a minute or two, until the wine is almost fully evaporated.  Now is when the real cooking begins!

Pour a ladle of the stock over the rice.  Stir well to make sure that all the rice has lifted off the bottom of the pan.  Now sip a little wine for minute or two. Once the liquid has almost fully evaporated in pan, add another ladle full and repeat. Continue this process (the sipping of wine is fully optional but highly recommended) until you have incorporated all the stock into the risotto.

Taste a bit of the risotto and be sure that the rice is tender but still a little firm in the middle. Turn off the heat and stir in the cheese.  Now check for seasoning, adding salt and pepper to taste. At this point, put the lid on your dutch oven and let the risotto rest for a few minutes for up to 15 minutes  (it will absorb some of the liquid in the pot and firm up just slightly).

Now heat up the butter in a saute pan over medium heat.Chop the sage leaves and add to the butter.  Let this cook for a minute or two but don't let the butter brown too much.

Call the guests to the table.  Ladle out risotto into 4 bowls. Drizzle a teaspoon of the sage butter over the top of each bowl and sprinkle with additional cheese if you like. I also like to drizzle just bit of olive oil over the top to create a truly luscious texture. Serve immediately.

You can serve this with a fresh green salad, but the risotto is a wonderful meal all by itself.

French Style Onion and Oven Roasted Tomato Soup

It is amazing that the farmer's market still has such gorgeous tomatoes.  All of the organic tomatoes today were small and beautiful in color.

With my goal of trying to make food using only produce from the farmer's market, I decided that today's bounty would make a wonderfully sweet and luscious soup.

Roasting the tomatoes and caramelizing the onions brings out the most intense flavors.  Adding some herbs and garlic just enhances the natural flavors of the produce.

Because it takes a little time to make, it is the perfect soup to make on a day where you are at home with a list of chores as it takes very little man power, just random checking in.

French Style Onion and Roasted Tomato Soup
serves 4

  • 3 lbs tomatoes
  • 3 medium onions (or 6 small onions as that's what was available at the farmer's market)
  • 3 cloves of garlic, sliced
  • Thyme sprigs
  • Salt, black pepper and red pepper flakes
  • Olive oil
  •  4 c. vegetable broth (I prefer 2 tsp. of Better Than Bouillon and 4 cups water)
  • 1 tbs. dry basil
  • 1 tbs. balsamic vinegar 
  • 12 slices mozzarella cheese
  • 4 tbs parmigiano reggiano cheese, grated
Preheat the oven to 325 degrees
(cook time is 2 1/2 hours, but active time is only about 30 minutes)

Cover the bottom of a large baking sheet with olive oil.  Cut the larger tomatoes in half and core. Place all tomatoes on the baking sheet in a single layer.  Peel and slice the garlic and scatter over the tomatoes (note: don't crush the garlic here like everyone does on TV to peel it, simply roll the clove around on your cutting board a few times and the skin will come right off.  This allows you to slice the garlic cloves more easily).  Then lay a few branches of thyme over the tomatoes. Drizzle with more olive oil and season liberally with salt and black pepper. Place in the oven to roast for 2 hours.

Meanwhile, peel and slice the onions. Heat a large skillet over medium high heat. Add olive oil to the pan and add the onions. Season with salt and red pepper flakes to taste. The red pepper flakes infuse into the sweetness of the onions and it is wonderful.  Saute for a minute or two until the onions are coated in oil and the pan is sizzling. Then reduce the heat to low and cook for 1 hour and 45 minutes, until the tomatoes are done. Cooking on such a low temperature takes much longer, but it also takes much less maintenance.  Stir the onions every 15 minutes or so.

Put the tomatoes and all their lovely juices into a soup pot along with the garlic, removing the thyme stems. Add 4 cups of stock.  Puree the soup with an immersion blender, blender or food processor. Be sure to keep the tomato skins that will get stuck in the immersion blends as they will add great texture to the soup.

Now add the onions, basil and balsamic vinegar.  Bring to a simmer and cook on low heat to meld all the flavors. This soup can sit on the stove on low for quite a while.

Preheat the broiler in your oven.

When you are ready to serve, ladle soup into ramekins. Cover with the slices of mozzarella cheese and then sprinkle 1 tbs of Parmesan on top of the mozzarella. Put on a sheet pan and place in the oven until the cheese is browned.  Serve with a green salad and/or bread.


Scrambled Eggs with Apples, Onions and Oregano

Fall is the time when you start looking for dishes that are a little heartier. And to live deeper into the local food movement, every ingredient in this super flavorful dish is at the farmers market right now!

I had this dish for the first time years ago when I lived in Charlottesville Virginia.  The combination seemed so odd but tasted so wonderful. I've since bumped up the heat and made the cheese optional.

This is very high in protein for vegetarians and so full flavored that everyone will enjoy this for brunch, lunch or a light supper with a green salad.  The combination of apples, onions and oregano is fabulous.  If you want, add a small handful of cheddar cheese to add to the richness of the dish.

SCRAMBLES EGGS WITH APPLES, ONIONS AND OREGANO (plus cheddar cheese if you like)

serves one and super easy to double or quadruple

  •   3 eggs beaten
  • 1 small apple, cored and cubes
  • 1/2 medium onion, diced
  • 1/2 tsp dry or fresh oregano or to taste
  • olive oil
  • 1/4 tsp red pepper flakes or 1/4 hot pepper, seeded and minced
  • salt and pepper to taste
Start by heating up a non-stick skillet to medium to medium high.  Add a little olive oil to the pan and then add the onions, apples, oregano, red pepper and a sprinkle of salt.  Saute for about 5 minutes until the vegetables are just starting to soften.

Add the eggs and sprinkle with a bit of black pepper and cook for one minute.Turn off the heat and continue to cook, using the residual heat of the pan, until the eggs are done to your liking. This will take two to four minutes depending on how dry you like your eggs. (if adding cheddar cheese, do so as you turn the heat off so it has ample time to melt without cooking.)

This is excellent with a tossed salad and a glass of red wine!

Savory Chard Pie

This recipe is a standard go-to in our house. The flavors are beautiful and unique, the ingredients are healthy, and this dish is just as good when reheated later in the week.


You can almost always find chard year round. And this time of year your can find it at the Bloomington Winter Farmer's Market. It is grown all winter hydroponically by a local farmer and it is so amazing to cook with such wonderful and fresh local ingredients all year. The photo to the left is of the stems from rainbow chard which are incorporated into the pie. Nothing goes to waste here.

The original recipe for this dish was from Laura Calder. Her version uses bacon but it was quite easy to manipulate the recipe to make it vegetarian.

A couple of kitchen items will make this dish come together more easily: a 10 inch sping form pan, parchment paper, 1/2 lb. dry beans or pie weights.

Savory Chard Pie
  • 1 pie crust (I cheat and use Pillsbury premade pie crusts)
  • olive oil
  • 2 shallots, minced
  • 2 garlic cloves, minced
  • 1 1/2 lb swiss or rainbow chard
  • 3 eggs
  • 1 cup creme fraiche (easily found in the cheese section of Bloomingfoods east side)
  • 4 oz gruyere cheese, grated
  • a generous handfull of raisins
  • a small handfull of pine nuts
  • salt and black pepper
To start, blind bake the pie crust in a 10 inch spring form pan or deep pie plate (I prefer to use a spring form pan because it makes for a lovely presentation, but it will be delicious either way). HOW TO BLIND BAKE: Pre-heat the oven to 450.  Roll out the pie crust and place in the spring form pan, pressing the crust up the sides of the pan. Take a large piece of parchment paper and lay it over the pan. Then pour in pie weights or dry beans to cover the bottom of the pie.  This will keep the crust from rising up during baking. Then place in the heated oven for 10 minutes.  Remove the pan from the oven, lift out the parchement paper with the beans and then return the pan to the oven for three more minutes to allow the bottom of the crust to brown slightly. Remove from the oven and set aside until you are ready to bake the pie.

Reduce the oven temperature to 375.

Start by filling your sink with cold water. Add the chard, stems and all, and let them soak for a few minutes to loosen any dirt. Then pick up each leaf, grab the bottom of the stem in one hand, and use the other hand to pull the leaf from the stem. If the stem breaks off with the leaf, it's OK because it means that the stems are tender at that point.  Save the stems and put the  leaves back in the water to continue to soak.

In a saute pan, heat olive oil over medium heat. Add the shallots, season with salt and pepper, and cook for about 3 mintues. Then add the garlic and cook for two more minutes, stirring often to keep the vegetables from browning too much. Remove the shallots and garlic to a large bowl.

Put the pan back on the heat over medium.  Add olive oil to the pan. Chop the chard stems into small pieces and add to the pan with salt and pepper. Put a lid on the pan and cook for 4 minutes.  While the chard stems are cooking, remove the leaves from the water and wring dry.  Chop the leaves coursely.  Then add the leaves to the pan, season again with salt and pepper, and cook for five minutes uncovered. The leave should be well wilted.  Remove the chard and add to the bowl with the shallots and garlic. (If there is water in the bottom of the pan, use a slotted spoon to remove the chard leaving the water behind.)

In a dry saute pan, add the pine nuts and toast over medium high heat, stirring often, until they start to brown.  Add them to the bowl with the chard. 

Now add the large handfull of raisins to the bowl as well and stir to combine. Then add the grated cheese and stir to combine. Now check for seasoning. You want this mixture of chard, raisins, pine nuts, shallots, garlic and cheese to be very flavorful at this point.

In a seperate bowl, combine the eggs and creme fraiche and beat until well combined. Season with salt and pepper.

Place the vegetable mixture into the pie crust.  This should fill the crust almost to the top. Then pour the egg and creme fraiche mixture over the top as evenly as possible. It will look as if it is about to overflow, but it should not...

Now place the pie in the heated oven and bake for 35 minutes, until set in the center.  I find that a couple of extra minutes in the oven does not hurt this dish at all.

Let cool slightly or serve at room temperature. This pie will serve six as a main course when served with a salad.

If there are left overs, it can be eaten cold and it is delicious. Or reheat in the microwave for 45 seconds to warm through.

Four ingredients to the perfect comfort food: Cauliflower Gratin


Whenever we are looking for cozy and simple comfort food in our house, this is one of our go-to dinners.  With just four ingredients (often already in house), thirty minutes, plus a green salad, we are set!


Cauliflower Gratin
  • 1 head cauliflower, cut into large florets keeping much of the stem
  • 1 cup heavy cream (comfort food, not diet food)
  • 1 cup grated cheese such as cheddar and Parmesan
  • 2 tbs. Dijon mustard
  • salt and pepper to taste
Pre-heat oven to 425.

Drop the florets into boiling salted water and cook for 4 minutes. Drain and set on a kitchen towel to help them to dry.

In a mixing bowl, combine cream, mustard, 1/2 tsp or more of black pepper and 1 tsp. salt. 

Place the cauliflower into a baking dish and it should fit in one layer with only some overlapping of florets.  Stir in the grated cheese to mix well. Then pour over the cream mixture.

Bake in the middle of the oven for 30 minutes or until the edges are dark brown and the center is bubbling.

Vegan Hearty Winter Stew


This is a full flavored winter stew that makes the most of the fresh produce available at our markets this time of year.

And it is only vegan because the flavors and textures are so rich, you don't need to add any dairy to complete the dish.

Vegan Hearty Winter Stew
  • 2 tbs. olive oil
  • 1 red onion, chopped
  • 2 medium leeks, cut in half lengthwise and then sliced
  • 2 tsp. black pepper
  • 2 tsp. salt
  • 1/2 bunch parsley, chopped
  • 1 bunch watercress, chopped
  • 1 bunch kale or other dark hearty green, chopped
  • 2 large parsnips, peeled and diced
  • 2 carrots, peeled and diced
  • 6 medium potatoes, diced
  • 8 cups vegetable stock (see note at bottom of post)
  • 1 cup frozen peas
  • 1 cup frozen corn kernels
  • 4 tbs. flour
  • 6 tsp. Dijon mustard
In a large dutch oven or soup pot, saute the onions, leeks, salt and pepper in olive oil over medium heat for 7 or 8 minutes.

Add the parsnips, carrots and potatoes and saute for 5 minutes.

Pour in the vegetable broth and bring to a boil over high heat.  As soon as the soup is at a boil, reduce the heat to  medium low and simmer until the root vegetables are tender, about 15 minutes.

Then add the kale, parsley, watercress, peas and corn.  Continue to cook for 5 to 7 minutes.

Remove 1/2 cup of the broth and put it in a small bowl or glass jar along with the flour and mustard. Stir to combine. Then slowly stir into the soup. The flour will thicken the soup slightly and the mustard will add a wonderful burst of flavor.  Cook the soup for 5 more minutes and serve with crusty bread.

Check out the recipe for the Vegetarian Pot Pie with Chive Biscuit Top that uses the left overs of this soup.

*Whenever a recipe calls for vegetable broth or stock, I use Better-Than-Bouillon Vegetable Base. You can find this at Bloomingfoods and Marsh in the soup and bouillon section. I always have a jar in my pantry. Simple stir in one teaspoon for each two cups of water and you'll have instant broth that adds tremendous depth of flavor instantly.


Vegetarian Pot Pie with a Chive Biscuit Top

Whenever I make a chowder, stew or hearty soup, I always make extra so we can have pot pies later in the week. The base for this soup is my Vegan Winter Vegetable Soup. Sometimes I use this biscuit topping, sometimes a store bought pie crust, and sometimes I go with a shepherds pie and use left over mashed potatoes. Anyway you go, this is a wonderful country style meal.

The biscuits in this recipe have butter. Using a pie crust or mashed potatoes that are vegan would make this dish vegan as well.

Vegetarian Pot Pies with a Chive Biscuit Top serves 4

  • 4 cups left over Vegan Winter Vegetable Soup (or any left over soup you have made this week)
  • 2 cups flour
  • 2 1/2 tsp. baking powder
  • 1 tsp. salt
  • 1/3 c. cold butter, cut into cubes
  • 2/3 cups cold milk (you may need more or less)
  • 1/2 cup chopped chives or fresh herb of your choice
Preheat the oven to 375 and butter 4 individual ramekins or one 8" x 10" x 2" baking dish.

To make the biscuit topping, put the flour, baking powder and salt into the bowl of a food processor. Pulse several times which will mix the ingredients and act as a sifter. Then, with the motor running, add the cubed butter a couple of pieces at a time until all has been used and the flour mixture has small pea sized pieces of butter throughout. This will only take a few seconds. Then add the herbs and pulse two or three times.

With the motor running, slowly add the cold milk a little at a time until the dough begins to form a ball around the blade. Stop the processor and turn the dough out onto a floured work surface.

Kneed the dough a few times, adding a little bit of extra flour if the dough is sticky. Then roll out into a square that is about 10" x 10". If making individual pot pies, cut
out the pie crust into circles that are just smaller than the tops of the ramekins. If are using a larger baking dish, cut the dough into 4" x 4" squares.

Ladle the soup into the ramekins or baking dish. Place the biscuit dough on top. You can brush egg wash over the top if you want an extra golden crust. Sprinkle the top of the dough with a little kosher salt. Place in the oven and bake for 25 to 30 minutes, until the pot pie is bubbling around the edges.

Serve once the pot pies have had a few minutes to cool.


Maple Roasted Winter Squash


This all started last fall. I bought a few mini squash to use as decoration in my house. And since I try to be an organic gardener and environmentally responsible, I tossed the squash out into my garden once the Christmas season approached and it was time to swap squash for pine cones (I do love a predictable holiday decor sometimes).

Spring came and my garden was coming to life with herbs, cucumbers and tomato plants. Then summer came, the dry heat arrived, and along with this came squash vines. And these vines grew and grew and grew. As fall approached, beautiful mini squash appeared everywhere!

I harvested twenty or so to use as decorations for a large tented dinner that we hosted in October. My three year old niece, while visiting from North Carolina, was able to harvest these mini pumpkins just days before Halloween.

Then Thanksgiving came and of course I had to used these gorgeous gourds to showcase the bounty of this fall feast day.

Anyway, practicality came into play the other night. I was hungry, there was nothing in the house to eat, and it was raining and I didn't want to go the grocery store. And then my eyes lit on the pile of mini squash that were still scattered around my dining room.

So a year after my purchase of some ornamental chachka, dinner was finally served.

Maple Roasted Squash

  • Your choice of a winter squash
  • olive oil
  • maple syrup
  • salt and pepper
Preheat the oven to 400 degrees. Cut the squash in half through the stem end. Remove the seeds (save for composting and next year's bounty). Put the squash cut side up on a baking sheet lined with foil or parchment paper. Mix equal parts olive oil and maple syrup. Brush liberally over the squash. Season with salt and freshly cracked black pepper. Roast in the oven for 35 minutes or until the squash are fork tender.
To use any leftover roasted squash, check out the recipe for Pasta with Roasted Squash, Kale and Brown Buttered Sage in the 'main course' category.


Pasta with Roasted Squash, Kale and Brown Buttered Sage


This is a quick and simple pasta dish that is a complete meal in one bowl...my favorite kind of pasta dish.

Created to use up left over roasted squash from another meal, you could certainly use frozen butternut squash. Simple thaw and saute in a little olive olive oil and maple syrup. Then add to this recipe as directed below.

Pasta with Roasted Squash, Kale and Brown Buttered Sage Leaves serves 4
  • Olive oil
  • 1 red onion, thinly sliced
  • 1 tbs brown sugar
  • 6 anchovies (optional)
  • 2 cups roasted squash, cubed (or frozen and prepared as noted above)
  • 4 cups kale (or other dark greens) shredded or chopped
  • 1 lb. penne or your favorite pasta
  • 1 tbs. butter
  • 10 sage leaves
  • salt and pepper to taste
  • 1 cup grated parmesan cheese
Bring a large pot of salted water to a boil and add the greens. Cook for ten minutes if using a thick sturdy leaved green like kale, or 5 minutes if using chard or another softer leaved green.
While the greens are cooking, heat a large saute pan over medium heat. Add the oil, onions, brown sugar, anchovies, salt and black pepper. Once sizzling, reduce the heat to medium low to let the onions caramelize.
When the greens are cooked, scoop them out of the pot with a slotted spoon right into the saute pan with the onion mixture. Reduce heat to low and add the squash. Continue to cook.
Meanwhile, in the same pot that you cooked the greens, bring the water back to a boil (add more water if needed) and add the pasta. Cook for 8 minutes.
Add the pasta to the saute pan with the greens along with one or two ladles of pasta cooking water. Raise the heat to medium and cook to let the pasta water reduce and become a sauce.
Meanwhile, heat the butter in a small saute pan. Add the sage leaves and let the butter brown for two minutes or so. Turn off the heat and reserve this for plating.
When the pasta has cooked for 5 or so minutes, turn off the heat. Add 3/4 cups of the cheese, stir combine and cover the pan. Let stand for 5 minutes while you bring people to the table.
To plate, put pasta in 4 bowls, sprinkle the remaining cheese over the pasta and top with the brown butter and sage leaves.

Pasta de Provence


A dear friend just returned from NYC. While there, she visited her favorite herb shop and brought me a gift of a package of herbs de provence. The french blend of herbs traditionally contains savory, basil, thyme, lavender and fennel.

So with a cold wintry night at hand and a bag of herbs de provence in hand, I came up with this lovely french themed pasta dinner.

Pasta de Provence for 4
  • 1 1/2 lb. roma tomatoes (about 6 medium) quartered lengthwise and de-seeded
  • 2 tbs. herbs de provence
  • 4 shallots, thinly sliced
  • 1 garlic clove, minced
  • 5 oz. box of baby arugula
  • 1 lb. fettuccine
  • 8 oz. brie, cut into small cubes (this is much easier to do when very cold)
  • 1/2 c. white wine
  • 1/2 c. bread crumbs made from fresh bread, pulsed in a food processor
  • Olive oil
  • 1/4 c. chopped fresh parsley

Preheat the oven to 425. Place the quartered and seeded roma tomatoes on a baking sheet. Drizzle with olive oil, salt and 1 tsp. of herbs de provence. Roast for 20 minutes, then remove from the oven and let rest on the baking sheet until you are ready to incorporate them into the dish.
Boil the pasta in water with 1 tbs. salt until al dente, about 8 minutes.
Meanwhile, in a large sauce pan, heat olive oil over medium to medium low heat. Add the shallots, garlic, salt and pepper. Saute for 5 minutes, stirring often.
Add the roasted tomatoes, arugula and wine. Raise the heat to medium and cook until the greens are wilted and the wine has reduce, about 5 minutes.
Add the pasta to the pan with the greens, along with a half cup of the pasta cooking water. Stir to combine and let sit, covered, for 3 minutes.
While the pasta is resting, place the bread crumbs on the baking sheet that the tomatoes were roasted in. Drizzle a little olive oil over the bread crumbs with a little salt. Stir and put into the oven which is still at 425. Cook them for two or three minutes until golden brown. Remove the pan from the oven and, using a spatula, scrape up the bread crumbs and any brown bits left from roasting the tomatoes.
Transfer the hot pasta to a serving bowl. Add the brie cubes and stir to combine. The brie will melt within a minute or so. Sprinkle the bread crumbs over the top of the pasta along with 1 tbs. herbs de provence and the parsley. Then drizzle a little extra virgin olive oil over the pasta.
Serve immediately and enjoy the hardy flavors of France.

Eleven Madison Park Granola is perfection


Two years ago we were in NYC and Eleven Madison Park had just received four stars from the New York Times, a very noteworthy event. So we decided that we had to have lunch there will in the city (dinner was way out of our budget). The food was truly amazing as was the service and the decor.

Now visitors to Eleven Madison Park are given a small gift bag of this granola as they leave. And this is the bests granola I have ever had by far. The recipe is straight from the NY Times Magazine and has not been altered in any way from its original printing.

Eleven Madison Park Granola from Daniel Humm
  • 2 3/4 cups rolled oats
  • 1 cup shelled pistachios
  • 1 cup unsweetened coconut chips (I do use shredded as it is easier to find)
  • 1/3 cups pumpkin seeds
  • 1 tbs. salt
  • 1/2 cup light brown sugar
  • 1/3 cup maple syrup
  • 1/3 cup extra virgin olive oil
  • 3/4 cup dried sour cherries
Preheat the oven to 300. In a large bowl, mix together the oats, pistachios, coconut, pumpkin seeds and salt.
In a small sauce pan set over low heat, warm the sugar, syrup and olive oil until the sugar has just dissolved, then remove from heat. Fold liquids into the mixture of oats, making sure to coat the dry ingredients well.
Line a large rimmed baking sheet with parchment paper or a silicone baking mat, and spread granola over it. Bake until dry and lightly golden, 35 to 40 minutes, stirring granola a few times along the way.
Transfer to a bowl, add the sour cherries and mix well. Let cool completely before putting in an air tight container.
This is fabulous for breakfast with yogurt. It is also perfect for a snack on its own any time of the day. PS. it goes great with a gin martini too.
Note: this is a great recipe to take advantage of the bulk section of Bloomingfoods to cut costs and keep extra ingredients down.

Flash Fried Tofu with Lemon and Szechuan Pepper and Salt

This is adapted from a recipe from Kylie Kwong, a chef, cookbook author and TV host who makes the most delicious authentic Chinese food. Her cookbook Simple Chinese Cooking is a must for anyone wanting to venture into Chinese food that is true to the culture. And with so many Asian markets in Bloomington, all the ingredients are easy to find. I typically ask for help finding some of the more unique ingredients, but they are there...somewhere in the store.

Silken tofu make this dish amazing. The outside is salty and crunchy and the inside is mild and creamy.

Szechuan pepper is a mainstay in Kylie's ingredient list. They come in a bag, last forever, and add a wonderful and unique pepper taste with a mild numbing effect that is sensational. For Szechuan Pepper and Salt, simply heat the whole szechuan pepper corns in a dry pan until they start to brown and smoke. Then crush them in a mortar and pestle and add the same amount of salt as pepper. This is the perfect thing to sprinkle over this dish or any Asian inspired dish before serving to add a unique burst of flavor.

Flash Fried Tofu with Lemon and Szechuan Pepper and Salt


  • 1 package silken tofu
  • 1/2 cup flour
  • 1 lemon
  • vegetable oil (canola or grape seed)
  • szechuan pepper and salt
Silken tofu is very delicate, so you have to handle it very carefully. Cut open the package and drain as much of the liquid off as possible. Then place the block of tofu in a dish towel or several layers of paper towel to continue to drain. You will need to change the towels twice as they become saturated. This will take 15 minutes.
While the tofu is draining, put 2 inches of oil into a wok or deep sauce pan and heat over high heat to 350 degrees or when the top of the oil is shimmering.
Unwrap the tofu carefully. The cut the block in half through the waist horizontally. Then cut into 1 inch cubes. Put the flour in a shallow bowl and put the cubes of tofu into the bowl and carefully toss to cover completely with flour (don't worry if a few of the cubes fall apart). You will want to make sure the oil is hot before you do this step as the tofu should not sit in the flour for more than a minute.
Then carefully drop one of the small pieces of tofu into the oil. It should sizzle on contact. If it does, carefully drop the tofu, piece by piece, into the oil. Let them fry for a minute or two, then carefully turn them over. Let them fry, turning every minutes or so, for about 5 minutes or until golden brown. By now they will not be so delicate to handle.
Remove the tofu from the oil and put on paper towels to drain. Cut the lemon in half and drizzle lemon juice from half the lemon over the tofu. Then sprinkle liberally with szechuan pepper and salt. Serve immediately.
This is excellent with a quick vegetable stir fry made right before preparing the tofu in the same wok.


Marie Duane's Spinach Balls


We met Marie Duane while living in Woodstock and she and her husband Allan became great friends of ours. An evening at the Duane's was always a wonderful event. Marie was from New Zealand and she and Allan had lived all over Europe and they brought a very warm sense of entertaining with them to New York. I was taken by these spinach balls the first time I tried them.

Along with Ina Garten's Stilton and Walnut Crackers, this should be a mainstay in your freezer for last minute entertaining. Easy to make and they are best when cooked while frozen, this is a no brainer and full flavor appetizer.

Marie Duane's Spinach Balls
  • 2 packages of frozen spinach, thawed and squeezed dry
  • 2 cups stuffing mix (Pepperidge Farm works perfectly)
  • 6 eggs, beaten
  • 3/4 cup melted butter (1 1/2 sticks...not a diet food, but they are small bites)
  • 1 cup chopped onion (one small to medium onion)
  • 5 cloves garlic, minced
  • 1/2 grated parmesan cheese
  • 1 tbs. black pepper
  • 1 tbs. salt
Start by putting the spinach in boiling water to thaw. Then put in a colander and press dry with the back of a kitchen spoon. Let cool a few minutes. (The water that the spinach was cooked in can be the base for a healthy vegetable stock if saved.)
Mix all ingredients in a large bowl. You'll have to work to have the spinach evenly distributed. Then chill the mixture in the refrigerator for one hour.
Use a table spoon to scoop out a portion of the mixture and form into a ball. Put on a cooking sheet and continue. Then put the filled cookie sheet in the freezer for a couple of hours or over night. Then you can store them in an air tight container in the freezer.
When you are ready to bake them, preheat the oven to 425 degrees. Then put as many as you wish to serve on a cooking sheet, leaving a little room between each ball. Then back for 22 minutes.
Serve with dijon or spicy brown mustard.

Recipe: Brussels Sprouts and Pearl Onions in Horseradish Cream


The original recipe for this was clipped from Bon Appetit several years ago. And this dish is consistently a winner. The prep work can be done the day before and then it only takes a few minutes to put the dish together, so it's great for entertaining.

Brussels Sprouts and Pearl Onion is Horseradish Cream:
  • 1 10 oz. bag frozen pearl onions (easy to find at Marsh in the frozen veg section)
  • 1 1/2 lb. brussels sprouts, ends trimmed and blemished exterior leaves removed
  • 4 tbs. prepared horseradish
  • 2 tsp. flour
  • 1/4 tsp. allspice
  • 3/4 c. whipping or heavy cream (you can use milk, but the dish will not be as rich)
  • 3 tbs. butter
  • 1 tsp. chopped fresh thyme
  • Thyme sprigs for garish (optional)
Drop brussels spouts into salted boiling water and boil for 5 minutes. Add the bag of frozen pearl onions and continue to boil for two more minutes. Drain and set aside. This part can be done the day before.
In a bowl, combine the horseradish, flour, allspice and cream. Stir well. In a large sauce pan, melt the butter over medium heat. Add the fresh thyme and cook for 30 seconds. Add the brussels sprouts and onions and continue to cook for 3 for 4 minutes, until the vegetables are heated through. Add the cream mixture to the sauce pan and stir to coat all the vegetables. continue to cook, stirring often, for about 3 minutes. Taste for salt and pepper and season appropriately.
Serve garnished with a thyme sprig. Yum!

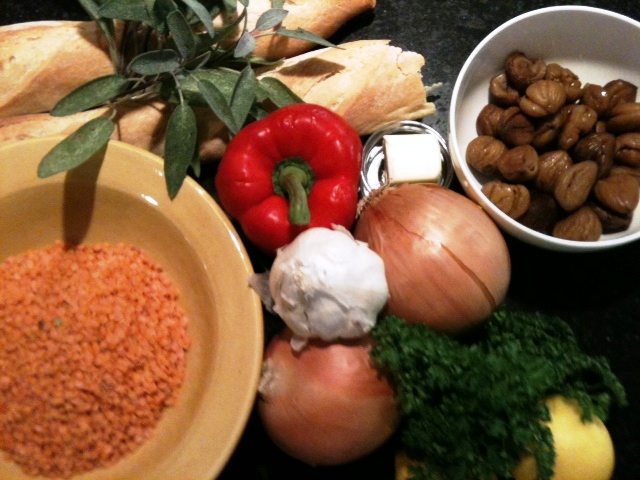
Bloomington Thanksgiving dinner 2011: Golden Lentil Roulade with Chestnut Stuffing


This is the premier vegetarian entree for Thanksgiving. The original recipe was clipped from a vintage Vegetarian Times, but it has been reworked because the first time I made it...let's just say it didn't work.

Don't be put off by all the different spices that are in this recipe. Using the bulk section of the east side location of Bloomingfoods, you can purchase just the right amount of each spice for just a few cents each.

This recipe calls for a total of 4 cups of fresh bread crumbs. One baguette will produce enough bread crumbs for the entire recipe (plus a little extra). Slice the bread and put it in a food processor until it the largest pieces of bread are the size of peas.


Golden Lentil Roulade with Chestnut Stuffing

  • 1 1/2 cup split red lentils
  • 3 cloves garlic, chopped
  • 2 cups fresh bread crumbs
  • 1/2 tsp. salt
  • 1/4 tsp. black pepper
  • 2 tbs. butter, at room temperature
for the chestnut stuffing:
  • 2 tbs. olive oil
  • 1 large onion (or 1 cup) chopped
  • 1 large red bell pepper, chopped
  • 1 1/2 cups canned or jarred peeled chestnuts (found a Bloomingfoods on their discount rack)
  • 2 cups fresh bread crumbs
  • 1/4 cup fresh sage, chopped
  • 1/4 cup fresh parsley, chopped
  • fresh sage leaves for garnish
Preheat your oven to 350.
In a medium sauce pan, combine the lentils and 2 cups water. Bring to a boil, cover and reduce to simmer for 15 minutes or until the lentils have absorbed all the water.
Stuffing: In a large saute pan, heat the olive oil. Add the onions and the red pepper and season with a little salt and pepper. Cook, stirring often, for about 7 minutes or until the onions are translucent.
In a food processor, combine the chestnuts, bread crumbs, sage, parsley and cooked onions and peppers. Pulse on and off until well combined. Transfer to a large bowl and add salt and pepper to taste. Keep in mind that this is the big flavor in the dish so don't be afraid to season really well.
Now for the lentil dough (and dough is used loosely here). Put the cooked lentils in the food process along with the garlic, bread crumbs, salt and pepper. Process until smooth. This will become like thick peanut butter.
Place a large (2' long) sheet of wax or parchment paper on the counter near your sink. Empty to lentil dough onto the paper. Wet your hands and gently kneed the dough a few times to create a log shape. Then pat out the dough until it is an 11 x 14 inch rectangle. You will need to wet your hands a few times during the process to keep the dough from clinging to your hands.
Now the easy part. Once the dough is in an 11 x 14 rectangle, spread the chestnut stuffing evenly over the dough, making sure to go all the way to the ends of the dough. Then, starting with the short end of the dough, start to roll it up using the parchment paper to help lift and roll the dough into a jelly roll shape.
Once rolled, you can wet your hands again and reshape the log if needed, replacing any of the stuffing that fell out of the ends.
Transfer to a well greased sheet pan. Rub the room temperature butter all over the outside of the log. Bake in the oven until heated through and the outside is just beginning to brown, about 15 to 20 minutes.
Transfer to a serving platter and garnish with the reserved sage leaves.

And check out the sandwich made with left over roulade in the 'Leftover Recipes' section.

Bloomington Thanksgiving dinner 2011: Thyme Infused Roasted Root Vegetables


This is another tear out from Vegetarian Times from 1990 something. Simple, easy and full flavor. You can adjust the final result by using more sweet vegetables like shallots, carrots and parsnips. I did this and upped the percentage of potatoes for a certain carboholic in the house.

I use all organic produce for this and Bloomingfoods on the east side is by far the best place for a great assortment of seasonal root vegetables.

Thyme Infused Roasted Root Vegetables
  • 8 medium shallots, peeled
  • 2 medium red-skin potatoes, cut into 1 1/2 inch chunks
  • 2 medium parsnips, peeled and cut into 1 1/2 inch chunks
  • 4 medium carrots, peeled and cut into 1 1/2 inch pieces
  • 1 small rutabaga, peeled and cut into 1 1/2 inch chunks
  • 1 turnip, peeled and cut into 1 1/2 chunks
  • 2 cloves of garlic, minced
  • 5 branches of fresh thyme
  • 1/4 cup olive oil
  • 1 tsp salt and 1 tsp pepper
Preheat your oven to 450.

In a large bowl, combine all ingredients and toss to coat evenly with oil, salt and pepper. Pour mixture onto a sheet pan/rimmed baking sheet and spread evenly for best browning of the vegetables. Roast for 35 or 40 minutes. Remove from the oven and let rest for a few minutes. Then scrape loose all the vegetables with a metal spatula and serve with a garnish of a thyme sprig.

You can make this the day before, refrigerate and then reheat in the oven for 15 minutes prior to serving at whatever temperature you are baking other dishes or at 350 degrees.

Bloomington Thanksgiving Dinner 2011: Brown Butter and Rum Pecan Pie with Rum Whipped Cream


The last time I made this pecan pie was when we were living in Woodstock, NY. We had ten friends over for dinner and during dinner the snow started coming down. Right before dessert the power went out...so no making the rum whipped cream in the mixer. Instead we did it the old fashion way by passing the bowl around the table, everyone taking a turn at whipping the rum and cream for desert topping. It was a lovely evening.

Brown butter and rum add a great depth of flavor to this classic southern pie.

Brown Butter and Rum Pecan Pie with Rum Whipped Cream
  • One store bought pie crust (I can't do any better than Pillsbury) or homemade pie crust
  • 6 oz unsalted butter
  • 1 cup Karo dark corn syrup
  • 1 cup sugar
  • 4 eggs
  • 4 tbs. rum (the original recipe called for dark rum, but light rum was what was in my pantry)
  • 2 tsp. vanilla extract
  • pinch of salt
  • 1 1/2 c whipping cream
  • 3 tbs. light or golden brown sugar
Preheat the oven to 350 and put the baking rack in the bottom third of the oven.

Roll out dough and put in a 9 inch diameter glass pie plate, crimping the edges.

Cook the butter in a sauce pan over medium high heat until brown, approximately 3 minutes. Add the corn syrup and stir. Then add the sugar and whisk until the sugar is dissolved. Remove from heat and pour the mixture into a heat proof bowl. Set the bowl in the fridge to cool to close to room temperature. This will take about 20 minutes or so.

In a mixing bowl, beat the eggs, rum, vanilla extract and salt to combine. Pour in the cooled syrup mixture and whisk vigorously to combine. Make sure the syrup mixture is cool enough to not scramble the eggs. Then stir in the pecans and mix well. Pour this mixture into the pie crust and bake for approximately 45 minutes. The top of the pie filling will have risen almost and inch and set and the crust will be gorgeous golden brown. In my oven this took closer to 50 minutes for the center to set.

This can be made the day before. Keep at room temperature covered loosely with foil once it has completely cooled.

For the whipped cream, combine cream, 2 tbs rum and the light brown sugar and beat until peaks form. Feel free to pass the bowl around the table and have your guest help whip the cream into shape. It can burn calories and create memories.